
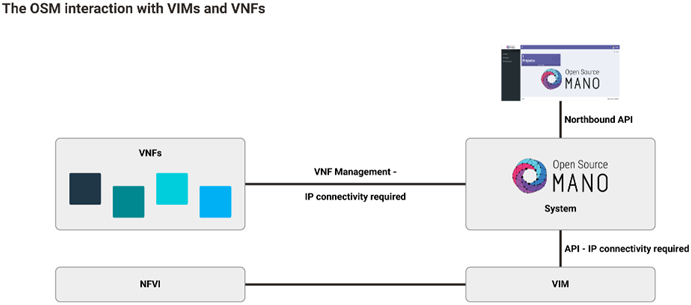
Basic Architecture
- Open Source MANO (OSM – version 10.0.3)
- OpenStack (version wallaby stable)
OSM requirements
- 2CPUs
- 6GB RAM (8 recommended)
- 40GB Disk space
- Single interface with internet access
- Ubuntu20.04 (64-bit)
Installing OSM
$ wget https://osm-download.etsi.org/ftp/osm-10.0-ten/install_osm.sh
$ chmod +x install_osm.sh
$ ./install_osm.sh
$ ./install_osm.sh --k8s_monitor (install OSM with an add-on to monitor the Kubernetes cluster)
Check the installation in the browser by accessing your host IP (by default user and password are admin).
Adding a VIM account
$ osm vim-create --name openstack-site --user admin --password userpwd \
--auth_url http://10.10.10.11:5000/v2.0 --tenant admin --account_type openstack
It is also possible to add the VIm through the OSM GUI:
Dashboard > Projects > admin > VIM Accounts > New VIMWhat is a Virtual Deployment Unit (VDU)
VDU is a basic part of a VNF. It is the VM that hosts the network function and its properties are described in the VNF descriptor.
Creating the VNF
Create VNF packages
$ osm package-create --base-directory ~/tutorial vnf tutorialThis command creates the base package for our VNF. We are defining the directory, package type and package name.
Change the VNF descriptor (VNFD)
You can find the descriptor in:
~/tutorial/tutorial_vnf/tutorial_vnfd.yamlWe will start by adding the basic info tou our desciptor:
vnfd:
   id: tutorial_vnf
   description: A basic VNF descriptor with one VDU
   product-name: tutorial_vnf
   version: "1.0"
As you can see, we are defining an id, description, product name and version.
Next, we want to add our deployment flavour:
df:
   - id: default-df
instantiation-level:
   - id: default-instantiation-level
vdu-level:
   - number-of-instances: "1"
      vdu-id: tutorial
vdu-profile:
   - id: tutorial
     min-number-of-instances: "1"
This block of code defines a default instantiation level, with 1 VDU instance and with id as tutorial.
ext-cpd:
- id: vnf-cp0-ext
   int-cpd:
      cpd: vdu-eth0-int
      vdu-id: tutorial
mgmt-cp: vnf-cp0-ext
Here we are defining the connection points:
- The external will connect the VNF to the exterior, so it can be accessible by the Network Service.
- The internal will create the connection point to the VDU.
Next, we will define the image to be used. Keep in mind that it needs to exist in your VIM account.
sw-image-desc:
- id: "Ubuntu Server 20.04"
   image: "Ubuntu Server 20.04"
   name: "Ubuntu Server 20.04"
Now, we have the VDU specifications:
virtual-compute-desc:
- id: tutorial-compute
   virtual-cpu:
      num-virtual-cpu: "1"
   virtual-memory:
      size: "1.0"
virtual-storage-desc:
- id: tutorial-storage
   size-of-storage: "10"
As you can see, we are defining the CPU, memory and storage for the VDU.
Finally, the VDU configuration:
vdu:
- cloud-init-file: cloud-init.cfg
   id: tutorial
   int-cpd:
   - id: vdu-eth0-int
      virtual-network-interface-requirement:
      - name: vdu-eth0
         virtual-interface:
            type: PARAVIRT
   name: tutorial
   sw-image-desc: "Ubuntu Server 20.04"
   virtual-compute-desc: tutorial-compute
   virtual-storage-desc: tutorial-storage
We are giving it a cloud-init file that will be explained later.
We also referring the already created connection points, image, storage and IDs.
Cloud-init file
You can find it in:
~/tutorial/tutorial_vnf/cloud_init/cloud_init.cfgThis file has the basic initial configurations in the VM:
#cloud-config
password: tutorial
chpasswd: { expire: False }
ssh_pwauth: True
package_update: true
packages:
   - nmap
We are changing the password, allowing ssh connections with credentials and installing the nmap package.
Validate and Upload the VNF package
$ osm nfpkg-create ~/tutorial/tutorial_vnfThis command validates and uploads the package to OSM. Make sure you input the correct VNF directory.
Creating the NS
Create NS packages
$ osm package-create --base-directory ~/tutorial ns tutorialThis command creates the base package for our NS.
We are defining the directory, package type and package name.
Change the NS descriptor (NSD)
You can find the descriptor in:
~/tutorial/tutorial_ns/tutorial_nsd.yamlWe will start by adding the basic info tou our desciptor:
nsd:
   nsd:
   - id: tutorial_ns
      name: tutorial_ns
      version: "1.0"
      description: Simple NS with one VNF and a single Virtual Link
As you can see, we are defining an id, name, version and description.
Next, we need to create a Virtual Link. This link will connect our Network Service to our VIM Network:
     virtual-link-desc:
     - id: mgmtnet_2
       mgmt-network: true
       vim-network-name: proj_net
In our case, the VIM Network is called proj_net.
We also need to connect the NS to our VNF created before:
   vnfd-id:
   - tutorial_vnf
Make sure that the id is the same as the VNF.
Next, we need to establish the connections between the VNF and the VIM:
   df:
   - id: default-df
     vnf-profile:
     - id: "1"
       virtual-link-connectivity:
     - constituent-cpd-id:
        - constituent-base-element-id: "1"
          constituent-cpd-id: vnf-cp0-ext
        virtual-link-profile-id: mgmtnet_2
    vnfd-id: tutorial_vnf
Notice that the constituent-cpd-id is the same as the external connection point defined in the VNF descriptor.
Also, the virtual-link-profile-id has to be the same as the one created.
Validate and Upload the NS package
$ osm nspkg-create ~/tutorial/tutorial_nsThis command validates and uploads the package to OSM. Make sure you input the correct NS directory.
NS instantiation
$ osm ns-create --ns_name tutorial_ns --nsd_name tutorial_ns --vim_account TronThis command creates the instance of the network service. Notice that the –nsd_name option has to be the name of the ns package. In our case, the VIM account is
called Tron. Make sure that you input your VIM account.
If all goes accordingly, you should be able to see in the OSM interface that your instance is running and active.
You can also check if your instance is running in the VIM account.
Check the cloud init file
With the VMup and running, you can check if the cloud-init file worked:
$ ssh ubuntu@<your_machine_ip>
$ nmap
By connecting to your machine using ssh and checking the nmap package, you ensure that it worked as expected.
Video
For a better description of the tutorial, you can check our video here.